How To Perform Aluminum Dent Repair - Tips You Need To Know To Do It Right
Published by Pro Line Systems in Body Shop Equipment · Sunday 07 Nov 2021
Tags: Aluminum, Dent, Repair, Quick, Facts, To, Do, It, Right, |, Frame, Machine, |, Pro, Line, Systems, International
Tags: Aluminum, Dent, Repair, Quick, Facts, To, Do, It, Right, |, Frame, Machine, |, Pro, Line, Systems, International
Aluminum Dent Repair How To Master The Technique
Presented by Pro Line Systems Int’l Inc
Auto Body Shop Equipment Distributors 305-793-9503

The Popular GYS ALU PRO FV Aluminum Repair Work Station
Facts About Straightening Aluminum Panels:
• Aluminum does NOT have a tendency to return to its original shape like steel which wants to spring back. As it is worked, aluminum gets harder and stiffer. So, the amount of straightening and pulling that can be done in one area is often limited and the sequence in which damaged areas are worked can be critical.
• A natural oxidation barrier forms on a bare aluminum surface immediately and must be removed before welding, filling, priming, or painting.
• Both heat-treatable and non-heat-treatable aluminum alloys may be heated during dent repair, but the allowable heat range for dent repair is generally between 400º and 570ºF. Above 570ºF aluminum loses its temper and the characteristics of the metal are changed.
• Aluminum is an excellent conductor of heat. It gets hot faster than steel, but it also cools more quickly. So, repairs must be carefully planned and done quickly, but gently and under control.
General Rules For Aluminum Repair:
1. Tools for aluminum repair, (brushes, files, dollies, abrasives, etc.) should be reserved only for that purpose and stored separately from tools used on steel.
2. Sanding and grinding should be done with 80 grit abrasive or finer.
3. To avoid cross-contamination and galvanic corrosion, filings, grindings, and dust from aluminum should be vacuumed up, not blown off. Tools should be wiped down after use.
4. Dents should be worked from outside inward (from indirect damage toward direct) to avoid creating a high spot. However, body line edges may have to be repaired first due to the work-hardening characteristic of the metal.
5. Heat should never be applied to panel areas containing adhesive.
Tools Needed:
1. Stainless steel wire brush.
2. Propane torch or induction heater
3. Non-contact thermometer or another heat monitor such as heat crayons, paint, strips, or a thermocouple.
4. Protective eyewear.
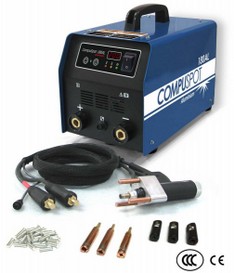
Using the CompuSpot 180 Dent Pulling System:
1. Disable the vehicle electronics and safety restraint systems according to the OEM’s recommendations.
2. Sand - grind and clean the area to be worked.
3. Prepare the machine by setting the power. Select a stud size based on the thickness of the panel (Note: For most thin panels like hoods, trunk lids, doors, etc. the 4mm stud is sufficient). Load the stud in the electrode holder with only 1 or 2 threads showing as depicted in the manual.
4. Before attaching a stud or pulling ring, vigorously brush the area you are placing the stud with a stainless steel wire brush and also the stud itself. Blow away any oxidation and wipe clean then apply the stud. Do this every time you are attaching a stud, this is very important because when aluminum is exposed to air it oxidizes very quickly and can cause a weak stud or pulling ring attachment.
5. If necessary due to the size and depth of the dent, heat the damaged area to 350 to 400° (Do not exceed 570°F) to, relieve the stress, raise the low areas, and reduce the overall size of the dent.
6. Allow the panel to cool and clean again, if necessary.
7. Apply the stud. "Begin with lower power settings" and test the stud for pulling strength. If the panel is very thick, it may be necessary to increase the voltage. Do NOT press too hard with the stud gun.
8. Install the stud puller and position the lifter bar or puller pliers close at hand to be ready to pull.
9. Reheat the panel as before and pull the dent while the panel is still hot. Work quickly, but gently. Take care, not to over-pull.
10. Remove the stud with side cutters. Do not try to twist off or flex the stud from side to side or will make a hole or crack the aluminum.
11. File or sand the area as necessary. NOTE: Some spatter from the stud welding process is normal.
An improperly cleaned panel, too high a voltage setting, and high humidity can all increase the amount of spatter.
Customers Also Checked Out These Popular Related Products
For All Your Body Shop Equipment needs we provide Free Consultation Cheerfully Given.
FYI: Hey, Curious about Giulio Valle, the Authoritative Author, and creator of this Blog and the
Pro Line Systems Website? Check Out Giulio's Interesting Brief Biography Here
Visit Us At
https://prolinesystems.net For All Your Professional Auto Body Repair Equipment Needs.

